Monday, December 10, 2012

Chalkboard In Kids' Room

I've always wanted to make a chalkboard wall for my kids in their room. I finally got it done all by myself! Yaay! Having a chalkboard wall can be very useful in many ways; kids can let their imagination and creativity go wild, can be good for learning, scribbling notes or messages for one another, and simply just having fun. The downside of this unfortunately, is that it can be very very messy. Messiness in the air, on the floor, on little hands, and even on clothes. I'm constantly battling with the dust from everyday sweeping and washing. It never ends. I always wonder if everyone else with chalkboard walls face the same problems like I do. Since it was my idea, I try my best to stay calm about this matter and just let the kids enjoy themselves and have fun. Even I enjoy doodling on it. Who doesn't? Hopefully my problems with the mess will reside within time.
Before
 

After


Paper Crowns

 
I got this crown off of this website http://www.4kraftykidz.com/GirlCraftKits.html I found during my search of paper crowns. Unfortunately, the craft didn't have a tutorial since it was only up for sale, so I basically made mine by eyeballing and using common sense. Here's the image I found:
 
These below images are the ones I made. I made two of them since I was making these for my daughter's classroom, one for the boys and one for the girls. I decorated them with all sorts of things I had on hand; glitter, sequins, gems and even a plastic rubbery spiderman item I found which added a nice touch to the boys' crown. I placed some adhesive clear film on them to keep them in good shape and to last longer since it was for a classroom, and I added a ribbon on both sides so it can be adjustable for all the kids. Too bad I took these quick photoshots, therefore I didn't get a chance to take pictures with someone wearing them.


With plastic film.

With ribbons.
 
This last picture has some vertical lines I occasionally get due to my camera being damaged. Didn't notice them before, so I don't have any better pictures. 


Toilet Paper Roll Flowers

 
This craft is was inspired by a craft I found online at http://ocfamily.com/ in the blogs section which came with a tutorial. I tried to attach the exact link, but for some reason I get a blank page when I open the blogs section window. It could be the cookies in my browser... But if I do manage to get it to open I'll update you with the link. For now, here's the photo I found on that website and below that are mine.


There are so many amazing and creative crafts that can be done with toilet paper rolls, ranging from flowers, to animals, to even school supplies storage! Amazing amazing!!! You can even decorate your house with them! I was awed and surprised by all the creative creations that can be done by simply using these rolls that is cheap, easy and nearly always available! So start saving those rolls and put them to good use!

Sunday, December 9, 2012

Cootie Catchers For Reading

Inspired by QuirkyMomma found on instructables.com which is a great website on things that people make and how they make them. It's a really cool website, so do check it out if you haven't already. You can find QuirkyMomma's tutorial on cootie catchers for reading here:  http://www.instructables.com/id/How-to-make-and-use-a-Cootie-Catcher-for-Reading/


Sunset Photos Taken By Me


Wednesday, November 14, 2012

Fishtail Sideswept French Braid


This is another hairstyle inspired by princesshairstyles.com and is a great variation to the regular fishtail braid. My daughter's hair is a little short to be kept sideways, and my older daughter didn't let me do hers (her hair is a bit longer) so this was how it turned out. It mostly stayed on her back instead of being over her shoulder. Oh well... She wore this hairstyle for school so I guess it's better that it was out of her way. If you know how to a regular fishtail braid, then you will master this one easily. But it does take a lot of time so be verrrry patient. I didn't spray any water during the braiding process since I was afraid of losing control of the strands. I did spray a little before I started, but it dried up, so I guess mine turned out to be on the messy side. I'll have to water it down some more next time. Here's the tutorial:

Sunshine Burst (Never Ending French Braid Bun)


This hairstyle was inspired by princesshairstyles.com. It seems like it's usually called Never Ending French Braid Bun, but I think it looks like sunshine rays so I called it Sunshine Burst... These pictures were taken on my first try of this hairstyle and I'll have to say, it turned out pretty ok. My girls are always fidgeting and complaining when I work with their hair, so this was the best I could do.  My second try turned out even better, too bad we were in a hurry to go out and I didn't have time to take any pictures that day... From my experience, you can have the braided part of this hairstyle placed anywhere on the head depending on how you part out the circle, whether it's closer to the forehead or closer to the middle of the head. You can check out the tutorial here :
 

Neighborhood Cats

Random Post:
 
 
The other day I was simply looking out the window like I usually do and found 3 beautiful cats sunbathing on top of our tool shed. I was awed and amazed by the way they all looked so different in terms of colors and patterns, yet they were cuddled up and sleeping so peacefully in the warm sun. I quickly grabbed my camera and when I came back I was very lucky to find them in the same position and I took this amazing snapshot while I still could. I enjoyed watching them. Too bad my kids were at school, they would've loved seeing this in person. These are my neighborhood's wandering cats that are under no ownership. I only edited the surroundings a little bit and left the cats intact. It's just picture perfect like they were posing for me or something!

Braided Beehive

First of all, I'd like to point out that you may see some vertical lines visible on these photos due to my camera being damaged. Sometimes I get these lines and sometimes I don't....


I call this hairstyle the Braided Beehive and I just so happen to come up with it on my own! YaaaY! I just went with the flow... I didn't get it from the internet whatsoever, meaning from no blogs, no pictures, and no videos. Now I did try googling the name Braided Beehive and came up with many wacky hairdos. You may find this somewhere out there just probably under a different name. So I don't think that I'm that genius enough.

Making this hairstyle is very easy and straightforward. I just parted her hair down onto one side, then parted all her hair in a circle around her whole head with a rattail comb leaving equal amounts of hair all around her head outside of the circle I made. After that, I gathered the hair in the middle or on the inside of the circle and secured it in a bun in the center of her head to get it out of the way. Then I started a simple lace braid starting from the part line and close to her forehead. A lace braid is a type of braid where you add in new strands of hair only from one side. When I reached the top of her head forming my first braided circle, I temporarily pinned it down and out of the way and parted a new circle leaving equal amounts of hair all around. I combined the strands from the previous circle into the strands of the new circle to form one set of strands and started braiding a new braid. I made a third circle using this strategy and when I had no more hair to add into my lace braid, I just finished it off by braiding a normal braid and secured with an elastic. I tucked the ending of the braid inside the middle of the third circle as neat as possible and secured it with bobby pins. You can place a hair accessory like a nice flower or butterfly or something in the middle, but I thought that it looked better without anything so I skipped this step. I think this hairstyle would be great to wear on formal occasions.
 
 
Updated Pictures (same hairstyle, different day)


Tuesday, November 6, 2012

Diy Alphabet Wall Art

This project is still in process, but I'm just too excited to share it with you all! I can't wait any longer. Since I'm a huuuge procrastinator, I can say that I'm actually proud of myself for making a project I see online and actually doing it so quickly! Yaay!!! I'm usually just liking things and pinning them and jotting them down in my to-do-list. Well, hopefully not anymore!!! This is a huge progress for me. One baby step at a time....

So I was looking for some diy nice artwork to do for a playroom and this immediately caught my attention. There are a few other more projects I had in mind as well, but this is simply easy using simple materials I already had on hand. It's actually a Pottery Barn inspired project and was modified a little, but I have to say that Dawn Nicole's final piece of art was far more prettier. So I was inspired by her. You can find this project here along with her instructions: http://designedbydawnnicole.com/2012/03/alphabet-wall-art-pb-inspired.html

I changed my dimensions just a little bit since the paper I had was a 12x8. So I had no choice but to cut them into 8x8 squares instead of the 12x12 that Dawn Nicole did. For that difference, it affected my letter arrangement, therefore I had to squeeze them together. I can always make an extra row, but I think the 4x4 rows looks much nicer, so I didn't even bother with that. Also, my letter font was done freehand by me. Dawn has a link attached to download the font she used. I don't know if it was me or not, but I had a little trouble downloading them, so I just simply did them by myself making them as close as possible looking like hers. Also, since I haven't hung it up yet as you can see it's still on the floor, I was thinking about using double-sided tape for this process. Hope that works, don't feel like getting sticky with anything else, plus, I want it to be as flat as possible with no oozing. I never tried Mod Podge at all, I don't even know how it looks like. I'm not even sure I can find it where I live, but I'll ask around. For now, I'm going to try the tape, wish me luck! ;-)

Monday, October 29, 2012

Chocolate Banana Cake

Another great recipe for over riped bananas.  I stumbled upon this delicious recipe here http://www.foodnetwork.com/recipes/marcela-valladolid/mexican-chocolate-banana-muffins-recipe/index.html I made 2 major modifications to it. The first one is that since I don't have mexican chocolate around where I live, I just used regular semi-sweet baking chocolate. The second change is that I made mine into a cake rather than muffins. Works out  just the same. I did make muffins when I first did this recipe, but they were gone in minutes! So it turns out that making a cake lasts much longerrrr (at least for my family).... Enjoy!


Ingredients:

Flour 1 1/2 cups
Sugar 2/3 cup
Baking Powder 1 1/2 t.s.
Salt 1/4 t.s.
Mashed Bananas 2 cups
1 Large Egg
Butter 8 TB, melted
Milk 1/4 cup
Chocolate 3.5 oz, chopped

In a medium bowl, mix together  the flour, sugar, baking powder, and salt. In a separate bowl, mix together the bananas, egg, butter, and milk. Stir both mixtures together until well blended. Do not overmix. Stir in chocolate. Bake in a12x8 inch pan until slightly golden, or a toothpick comes out clean when inserted down the middle.

EggFaces

A friend of mine posted a picture which she found online of this interesting type of art on her Facebook wall, and it immediately caught my eye. I'm usually having trouble in getting my kids to eat eggs for breakfast in the morning. It's a constant battle. Sometimes I try sneaking them into their foods, like by adding an egg or 2 to their milkshakes, or by coating a slice of bread with an egg when making french toast. But there are times when I just want to make scrambled eggs or boiled eggs or any other type where the eggs are plainly visible. I want them to enjoy the texture and taste of it as it is. So when I captured the idea of making faces on eggs, I did a little search online for some ideas on face expressions. I simply cleaned each egg with a dampened washcloth and made different faces on each one with a fine permanent marker. It's really easy and very creative. It was fun having the kids choose the egg they want to eat for the day. They are more willing to eggs ever since I stumbled upon this wonderful idea! We also have more peaceful mornings. Yaay!!! Although, I do sympathize with the to-be-eaten eggs. Poor things. ;-)

Crayon Meltings

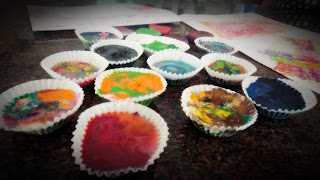
This is a very easy and simple project to do with your kids. It's a great process to do and very handy for those broken crayons laying around. All you have to do is just gather those crayons, tear off the wrappings, place into muffin cups lined with muffin sheets. Bake in an oven until melted, let cool, remove from muffin paper and color! Now I did this the hard and extremely messy way by chopping up the crayons into smaller pieces. I don't recommend doing this, but the reason why I did it was to have more colors in more cups. Doing this I noticed that when baking them, the smaller chunks would melt more quickly than the bigger chunks. I thought this left a really cool and interesting effect on the crayons. Some of them would have some texture to them, while others were smooth. I found that upcycling crayons is very good for little grasping toddler hands like my son "Green". Since he's new to holding pencils and normal crayons which tend to break and snap, using this shape is easier to grasp. It's good for practicing fine motor skills. The kids wanted to make some rainbow crayons and some solid color crayons, so these are what we came up with.


Sunday, October 28, 2012

Velvet Smocked Bolster

There was a time when I had the urge to make decorative throw pillows for fun. So I was looking around the web to find some easy instructions on making a simple pillowcase. I did find quite a few I liked, but somehow I came upon one throw pillow that I was just dying to try to make since it's so unique looking and much different than what I had in mind. I was so thrilled to challenge myself by trying something new. I'm so proud of myself with my final piece of art.

 
I came upon a YouTube video by TheBusyBeeMom  and she goes into a step by step tutorial on making this beautiful bolster with velvet in 2 videos. She explains very well with thorough details. It may seem very hard and complicated at first, but honestly it's really simple. Once you get the hang of it, there's really nothing to it. Like she mentioned, it's takes a WHOLE LOT OF TIME AND PATIENCE. The technique that is used here is all about measurements. It took me 3 days to make mine. It can get very addicting once it starts to form.


The below video is part 2 of the tutorial. For some reason I wasn't able to post part 1 but do check out this link for that: http://www.youtube.com/watch?v=Jl_kQve8HR0&feature=relmfu

 
All in all, great tutorial, beautiful piece!

Fishtail Flippee

 
This hairstyle was inspired by cutegirlshairstyles.com using a combination of her tutorials.The
first hairstyle I did was a flip using the tutorial above since I didn't have the topsy tail tool and was too lazy to make one, I just simply used my fingers for this step. The second hairstyle I did was a fishtail braid. It may seem complicated to do this but with the help of Mindy's tutorial http://www.cutegirlshairstyles.com/5-minutes/how-to-fishtail-french-braid-long-hairstyles/, I was shocked and awed by how easy it actually is! Although, she makes it into a french braid, I just made mine from a normal ponytail. But I do hope to accomplish that someday. Just one thing I want to point out, is that I made a medium high ponytail for the flip, because I didn't want it to end up being too loose. That's it! Have fun! :-)  

Friday, October 26, 2012

Upside-Down Caramel Banana Cake

I can't remember where I got this recipe from, therefore I can't give credits... But it's a great recipe and very useful if you have any over riped bananas laying around.


Ingredients:

Batter:
1 Mashed Banana
Sour cream 3 TB
Flour
Cinnamon 1/2 t.s.
Nutmeg 1/8 t.s.
Butter 6 TB (room temperature)
Sugar  Just under 1 cup
Vanilla Extract 1 t.s
2 Eggs

Caramel Topping:
Butter 4 TB
Brown Sugar 3/4 cup, lightly packed
Maple Syrup 2 TB
3-4 sliced bananas

Instructions:
Grease a 23 cm round or square pan.

Topping:
Melt butter in a saucepan over low heat, add brown sugar and syrup. Remove from heat once it starts to bubble. Pour sauce into the pan. Arrange sliced bananas over the sauce.

Batter:
In a small bowl combine mashed banana and sour cream, mix well. In a separate medium bowl, sift together flour and spices. Set aside.
Beat butter and sugar with an electric mixer until fluffy. Add vanilla and 1 egg. Mix. Add the second egg. Mix again. Add the flour mixture to the butter mixture and beat. Add sour cream and banana mixture and mix with a wooden spoon until just combined.
Spread into pan. Bake about 40-45 minutes, or when a toothpick comes out clean when inserted in the middle. Serve with a dollop of whipped cream.

Wednesday, October 24, 2012

Upside-Down Pineapple Cake

This is another recipe from my "Better Home & Gardens" cookbook which I absolutely love. It turns out really beautiful and delicious with a mix of textures and tastes. It turns out to be very soft and juicy, slightly tangy, and with a touch of crispiness here and there.


Ingredients:

Topping :
Butter 1/2 cup
Brown Sugar 1 cup
12 Pineapple rings 


Batter:
Flour 2 cups
Baking Powder 2 t.s.
Salt 1/2 t.s.
Nutmeg 1/2 teaspoon
Butter 1/2 cup, softened
Sugar 1/2 cup
Brown Sugar 1/2 cup
2 Eggs
Milk 1/2 cup
Vanilla 1 t.s.


Melt butter in a saucepan over low heat and stir in brown sugar. Bring to boil and stir frequently. Pour into a buttered 13x9x2 pan covered with wax paper. Spread evenly. Drain pineapple rings reserving 1/2 cup of the juice. Fit the rings into the bottom of the pan.

In a medium bowl, whisk together the flour, baking powder, salt, and nutmeg.

In a large bowl, beat butter, sugar, and brown sugar with an electric mixer. Add eggs. Beat in half of the flour mixture. Pour in pineapple juice and milk. Beat until combined. Beat in remaining flour mixture. Add vanilla. Spread batter into the pan. Bake until golden or toothpick comes out clean when inserted in the middle.

Note:
My cake in the picture is has more than 12 pineapple rings. I did this a while ago, so I think that I used a slightly larger pan.

Tuesday, October 23, 2012

Homemade Flour Tortillas

I love making these flour tortillas since it's really simple and easy and requires basic food staples that can be easily found in the pantry. It doesn't require any time to rise which is great for me since I hate waiting. The only drawback I face when I make them is the rolling process, which can be pretty tiring to the arms. But the final results turn out great and delicious when used as a wrap. I'll have to be honest and mention that these don't turn out the same every time. The first time I tried out this recipe they turned out soft and beautiful. The second time I tried it, they turned out crisp and crunchy. The third time was sort of in the middle. Isn't that funny? I mean, how can turn they out perfect on the first try and not so perfect on the others? My theory is that, maybe just maybe I rolled them out a little too much on the thin side the other 2 times I made them. I think they need to be about 1/4" thick in order to achieve a softer texture. The taste turns out delicious and very close like the tortillas that are available in supermarkets. I'll see what happens the next time I try to make them again and post an update to this recipe.


Ingredients:

Flour 3 1/2 cups
Salt 1 t.s.
Baking Flour 1/2 t.s.
Vegetable Oil 3.5 oz. (7 TB)
Hot Water 1 cup

Mix all the ingredients together and knead for approximately 3 minutes. Let sit covered for 15 minutes. Separate into small portions. Shape each portion into a ball and lay onto a lightly floured surface. Cover and let it sit for 5 minutes. Press out each ball with a roller on a lightly floured surface until a circle forms. Bake on a griddle pan till golden.

Notes:
I usually use a bowl or plate to in order to achieve perfectly shaped circles.

Homemade Cinnamon Rolls

I believe it's time to write out my first food post. I'm so excited to share with you all my experiences in the kitchen area. To be honest, I'm not very fond of this part in the house for not being experienced in this area that much. I'm always on the lookout for inspirations and ideas and try my best to get into the spirit of cooking...


I'm a huuuge cinnamon lover. I love the taste of it and the wonderful aroma! It seems rather soothing to me for some reason and fills me up with joy! I'm always secretly adding it into certain foods to add a little bit of flavor to it. This cinnamon roll recipe works wonders for me. It's really simple and works every time. They come out very soft, fluffy, and with a touch of goldness all around. The kids really enjoy gobbling it all up, good thing there's plenty to go around! ;-) I got this recipe from Better Homes & Gardens cookbook I used to have. So do try it out, you'll be amazed by how delicious they are!

Ingredients:

For The Dough:
Flour 6 1/4 - 6 3/4 cups
Yeast 1/2 oz
Milk 1 1/2 cup
Butter 1/2 cup
Sugar 1/2 cup
Salt 1 t.s
3 Eggs

For The Filling:
Sugar 3/4 cups
Butter 1/2 cup, melted
Cinnamon 4 t.s
Flour 2 t.s.
Nuts (optional) 3/4 cups, chopped

For The Icing:
Powdered Sugar 2 cups
Vanilla Powder 1/2 t.s.
Milk 2-3 TB

Instructions:

Dough
In a large bowl, combine 3 cups flour and the yeast. Using a saucepan, heat milk, butter, sugar, and salt until warm and butter has almost melted. Remove from heat. Add butter mixture to flour mixture and then add the eggs. Beat. Stir in as much of the remaining flour as possible. Turn dough onto a lightly floured surface and knead in remaining flour. Shape into a ball and place into a lightly greased bowl. Cover and let rise for about an hour or until it doubles in size.

Once it has doubled up, punch the dough down, divide it in half, place each half in seperate greased bowls, cover and let rise for about 10 minutes.

On a floured surface, roll out each half into about 12" squares. Spread half of the filling and half of the nuts over each square. Roll up, and pinch the edges to seal it up using a little water if necessary by dipping your finger in it.

Slice into 8 equal pieces and place onto a greased pan. Cover loosely with plastic wrap and place the pan in the refrigerator for approximately 2 hours. Once this time has passed by, remove from fridge, uncover and let it stand at room temperature for 30 minutes. Or another option is that you can let it rise in a warm place for about 1 hour. Break any surface bubbles with a greased toothpick.

Bake for about 20 -25 minutes or until lightly golden. Let it cool. Drizzle with icing.

Filling
In a small bowl, combine the sugar, butter, cinnamon, flour, and nuts (optional).

Icing
In a small bowl, combine powdered sugar and vanilla. Add enough milk to make of drizzling consistency. Drizzle over rolls.

Notes from my experiences:
This is the recipe I always use when I make cinnamon rolls, but I have made some slight changes that work best for me. You can try these modifications or make some that suits you better.

First of all, sometimes I add a little bit more yeast to make my rolls double up quicker and look fluffier at the same time. I think the waiting process takes some time and I get very impatient. I don't think that this really affects anything else that much so I just usually go for it. I would make it to about 1 oz. yeast instead.

Secondly, I double up the filling recipe as well without doubling the dough recipe. Since I'm very fond of the taste of cinnamon, I like the taste of it to be strong in every little bite. Also, it seems to make the the cinnamon rolls a little bit juicier I guess. Sorry, can't find a better word to describe it.

Thirdly, when I slice my rolls out. I don't really measure 8 equal rolls. I just simply go with the flow by approximating and try get more slices out of it. It makes much more than 8 rolls in my opinion.

And lastly, I bake them on a sheet of wax paper on a cookie sheet, this way it'll be easier to cleanup. I also found out that if I don't let them get too golden then they'll be much more softer and chewier. So first I let the bottom get juuuuuust a little bit golden, then I broil them from the top until they're juuuuuuuuust a little bit golden as well. My ending results turn better this way.

Monday, October 8, 2012

Homemade Finger Paint

Finger Paints are great for little kids since they tend to like the idea of getting messy. It's especially great for toddlers since they don't know how to use a paintbrush very well just yet. Fingers are the best tools for little painters.
I found this recipe here online by doing a simple search on finger painting and found that there's most likely just one basic recipe out there, so I won't give anyone any credit because they're all the same... It's really easy to make with simple ingredients that's most likely already in your cabinet. The only problem I had with it was that it tended to have somewhat of a bad odor during the cooking process. My kids really enjoyed painting with it. I never tried storing it so if you did please let me know how that worked out for you.

Ingredients:

2 Cups Water
1/2 Cup Cornstarch
1/2 Ts Salt
3 TB Sugar
Food Coloring

Simply mix all the ingredients except for food coloring in a saucepan over medium heat. Stir constantly until the mixture starts bubbling and thickens up. Once it thickens up and has a smooth consistency, remove from heat. Divide evenly among small containers and let it cool. Once it cooled down add the food coloring to achieve desired colors. Now it's time to get messy!