Wednesday, November 14, 2012

Fishtail Sideswept French Braid


This is another hairstyle inspired by princesshairstyles.com and is a great variation to the regular fishtail braid. My daughter's hair is a little short to be kept sideways, and my older daughter didn't let me do hers (her hair is a bit longer) so this was how it turned out. It mostly stayed on her back instead of being over her shoulder. Oh well... She wore this hairstyle for school so I guess it's better that it was out of her way. If you know how to a regular fishtail braid, then you will master this one easily. But it does take a lot of time so be verrrry patient. I didn't spray any water during the braiding process since I was afraid of losing control of the strands. I did spray a little before I started, but it dried up, so I guess mine turned out to be on the messy side. I'll have to water it down some more next time. Here's the tutorial:

Sunshine Burst (Never Ending French Braid Bun)


This hairstyle was inspired by princesshairstyles.com. It seems like it's usually called Never Ending French Braid Bun, but I think it looks like sunshine rays so I called it Sunshine Burst... These pictures were taken on my first try of this hairstyle and I'll have to say, it turned out pretty ok. My girls are always fidgeting and complaining when I work with their hair, so this was the best I could do.  My second try turned out even better, too bad we were in a hurry to go out and I didn't have time to take any pictures that day... From my experience, you can have the braided part of this hairstyle placed anywhere on the head depending on how you part out the circle, whether it's closer to the forehead or closer to the middle of the head. You can check out the tutorial here :
 

Neighborhood Cats

Random Post:
 
 
The other day I was simply looking out the window like I usually do and found 3 beautiful cats sunbathing on top of our tool shed. I was awed and amazed by the way they all looked so different in terms of colors and patterns, yet they were cuddled up and sleeping so peacefully in the warm sun. I quickly grabbed my camera and when I came back I was very lucky to find them in the same position and I took this amazing snapshot while I still could. I enjoyed watching them. Too bad my kids were at school, they would've loved seeing this in person. These are my neighborhood's wandering cats that are under no ownership. I only edited the surroundings a little bit and left the cats intact. It's just picture perfect like they were posing for me or something!

Braided Beehive

First of all, I'd like to point out that you may see some vertical lines visible on these photos due to my camera being damaged. Sometimes I get these lines and sometimes I don't....


I call this hairstyle the Braided Beehive and I just so happen to come up with it on my own! YaaaY! I just went with the flow... I didn't get it from the internet whatsoever, meaning from no blogs, no pictures, and no videos. Now I did try googling the name Braided Beehive and came up with many wacky hairdos. You may find this somewhere out there just probably under a different name. So I don't think that I'm that genius enough.

Making this hairstyle is very easy and straightforward. I just parted her hair down onto one side, then parted all her hair in a circle around her whole head with a rattail comb leaving equal amounts of hair all around her head outside of the circle I made. After that, I gathered the hair in the middle or on the inside of the circle and secured it in a bun in the center of her head to get it out of the way. Then I started a simple lace braid starting from the part line and close to her forehead. A lace braid is a type of braid where you add in new strands of hair only from one side. When I reached the top of her head forming my first braided circle, I temporarily pinned it down and out of the way and parted a new circle leaving equal amounts of hair all around. I combined the strands from the previous circle into the strands of the new circle to form one set of strands and started braiding a new braid. I made a third circle using this strategy and when I had no more hair to add into my lace braid, I just finished it off by braiding a normal braid and secured with an elastic. I tucked the ending of the braid inside the middle of the third circle as neat as possible and secured it with bobby pins. You can place a hair accessory like a nice flower or butterfly or something in the middle, but I thought that it looked better without anything so I skipped this step. I think this hairstyle would be great to wear on formal occasions.
 
 
Updated Pictures (same hairstyle, different day)


Tuesday, November 6, 2012

Diy Alphabet Wall Art

This project is still in process, but I'm just too excited to share it with you all! I can't wait any longer. Since I'm a huuuge procrastinator, I can say that I'm actually proud of myself for making a project I see online and actually doing it so quickly! Yaay!!! I'm usually just liking things and pinning them and jotting them down in my to-do-list. Well, hopefully not anymore!!! This is a huge progress for me. One baby step at a time....

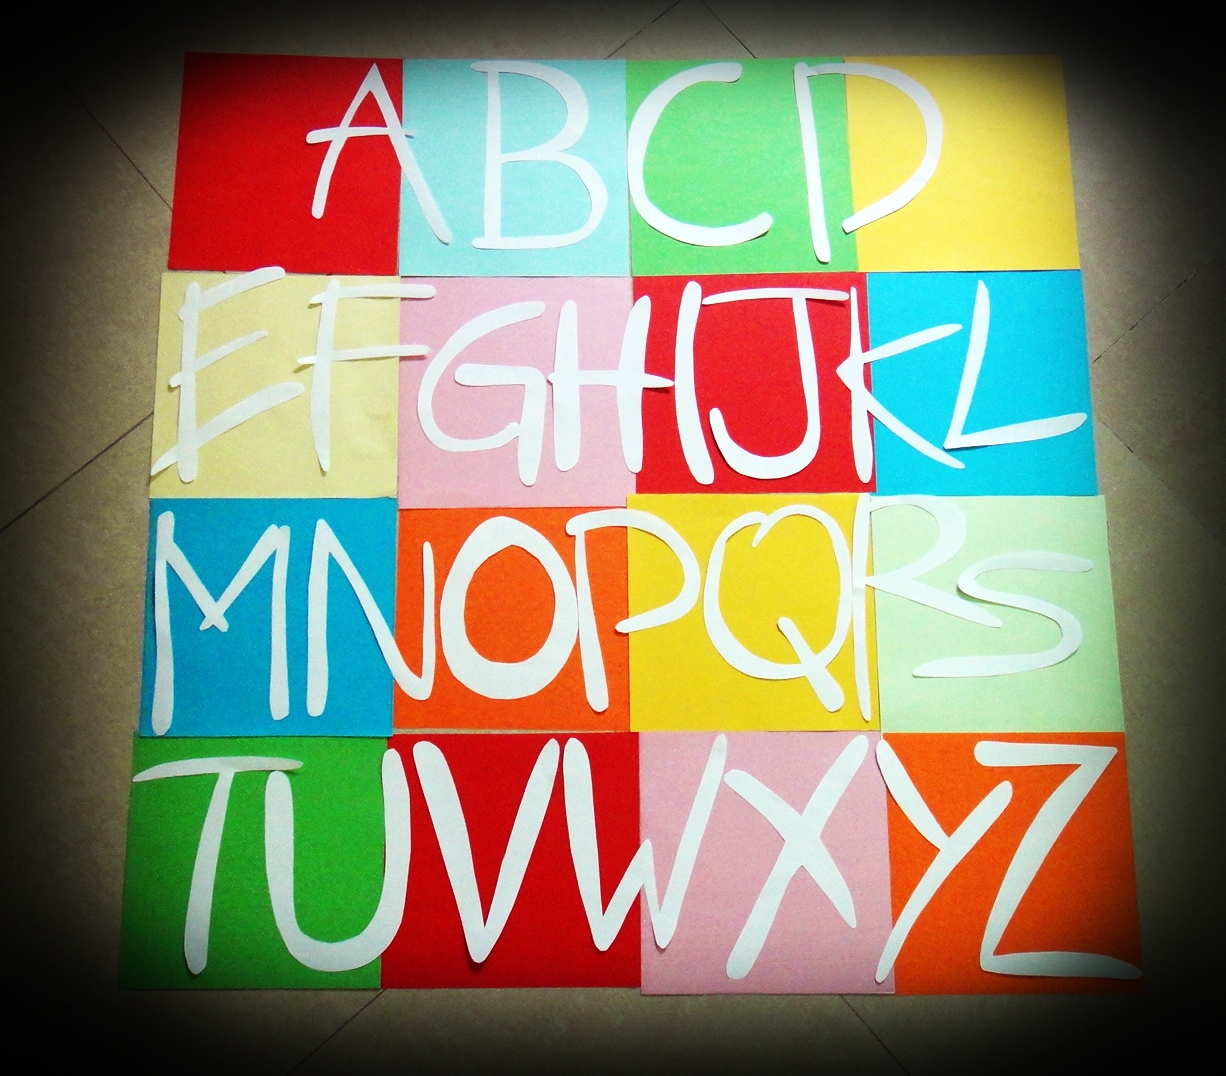
So I was looking for some diy nice artwork to do for a playroom and this immediately caught my attention. There are a few other more projects I had in mind as well, but this is simply easy using simple materials I already had on hand. It's actually a Pottery Barn inspired project and was modified a little, but I have to say that Dawn Nicole's final piece of art was far more prettier. So I was inspired by her. You can find this project here along with her instructions: http://designedbydawnnicole.com/2012/03/alphabet-wall-art-pb-inspired.html

I changed my dimensions just a little bit since the paper I had was a 12x8. So I had no choice but to cut them into 8x8 squares instead of the 12x12 that Dawn Nicole did. For that difference, it affected my letter arrangement, therefore I had to squeeze them together. I can always make an extra row, but I think the 4x4 rows looks much nicer, so I didn't even bother with that. Also, my letter font was done freehand by me. Dawn has a link attached to download the font she used. I don't know if it was me or not, but I had a little trouble downloading them, so I just simply did them by myself making them as close as possible looking like hers. Also, since I haven't hung it up yet as you can see it's still on the floor, I was thinking about using double-sided tape for this process. Hope that works, don't feel like getting sticky with anything else, plus, I want it to be as flat as possible with no oozing. I never tried Mod Podge at all, I don't even know how it looks like. I'm not even sure I can find it where I live, but I'll ask around. For now, I'm going to try the tape, wish me luck! ;-)